TL;DR: This article explains what a domain gateway is, how to build one, and why you would want it.
What is a Domain Gateway?
A domain gateway is a private case of the API gateway pattern. The website java-design-patterns defines the gateway pattern as follows:
With the Microservices pattern, a client may need data from multiple different microservices.
If the client called each microservice directly, that could contribute to longer load times, since the client would have to make a network request for each microservice called. Moreover, having the client call each microservice directly ties the client to that microservice – if the internal implementations of the microservices change (for example, if two microservices are combined sometime in the future) or if the location (host and port) of a microservice changes, then every client that makes use of those microservices must be updated.
The intent of the API Gateway pattern is to alleviate some of these issues. In the API Gateway pattern, an additional entity (the API Gateway) is placed between the client and the microservices. The job of the API Gateway is to aggregate the calls to the microservices. Rather than the client calling each microservice individually, the client calls the API Gateway a single time. The API Gateway then calls each of the microservices that the client needs.
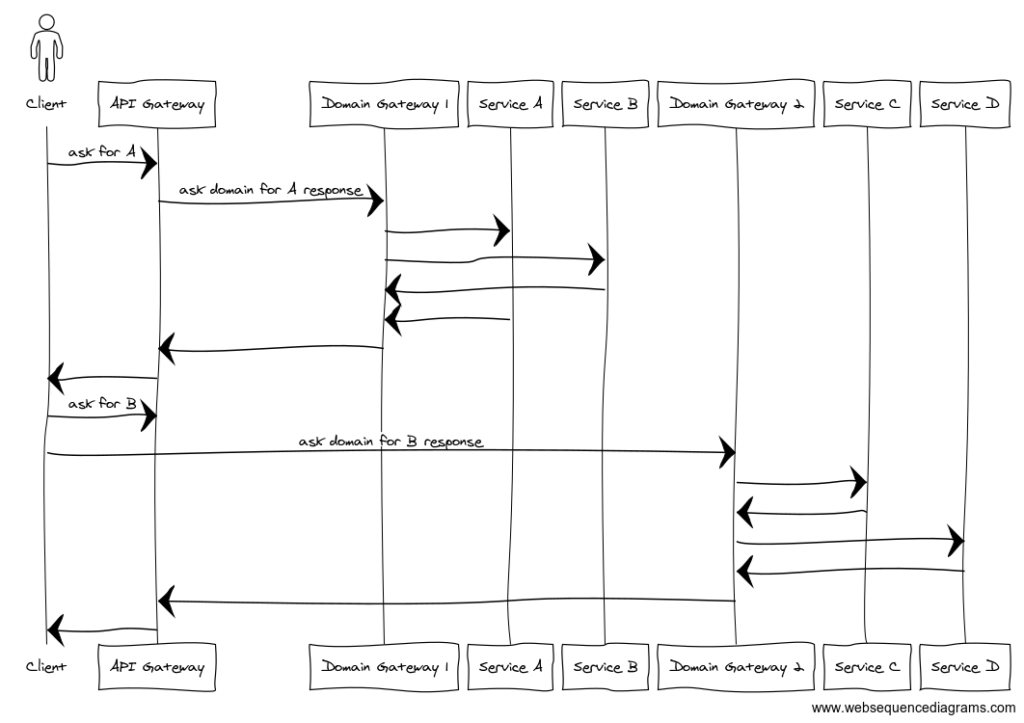
Like an API gateway, a domain gateway acts as a facade for clients. It allows aggregating calls to the backend into a single call for the clients. Additionally, it enables replacing backend services without impacting the clients. The following illustration shows a possible example of the domain gateway pattern:
Otherwise, if you prefer a class diagram, this illustration might make more sense:
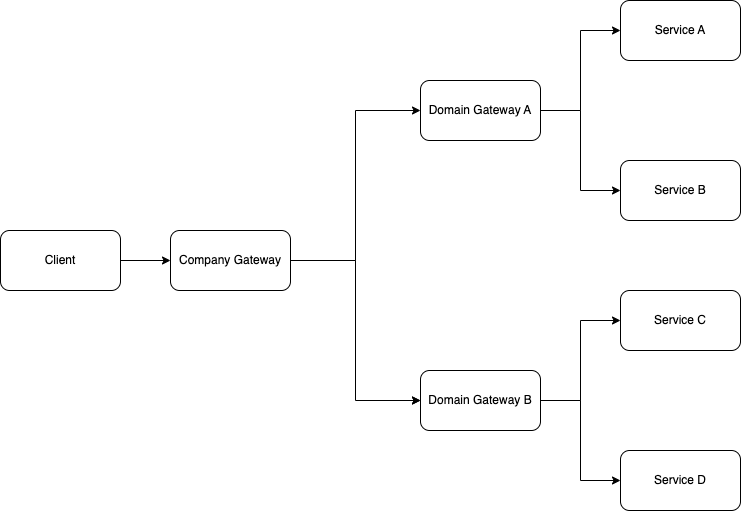
Note that a domain gateway doesn’t have to facade calls for the clients; it can proxy them if the API is simple enough.
Now that we understand what a domain gateway looks like, here are a few do’s and don’ts for this pattern.
Domain Gateway Do’s
- Keep it simple. It should handle request proxying and/or request aggregation if needed.
- Maintain API versions. It should forward the request to one or more APIs, each with potentially different versions.
- Ensure it is lightweight and can scale easily. If your domain gateway is unavailable, your entire domain will be unavailable.
Domain Gateway Don’ts
- Handle any business logic. For example, tasks such as sending emails or generating files should be performed by a dedicated service, and not the domain gateway.
- Store any business logic or object models in the database. The domain gateway should be completely stateless and not know about business logic specifics.
Ok, I’m Convinced…
I hope I have convinced you that a domain gateway is useful. If you have already read our article How to Use OpenApi to Build a Robust RESTful API, you probably know that I’m a fan of using OpenAPI specs for your service. The problem introduced in my previous article is: how can I generate many specs at once?
How Do I Build a Domain Gateway?

Tech Stack
We will use the following tech stack:
- Kotlin – After all, this is a blog about Kotlin…
- Spring Boot – We will use Spring Boot 3, with indications of the required steps for Spring Boot 2
- Gradle Kotlin DSL – We will use the Gradle multi-module solution in our example where each service would be a different module.
- Retrofit – While the OpenApi generator supports multiple REST clients, I decided to go with my personal favorite.
- OpenAPI
Domain Gateway Structure
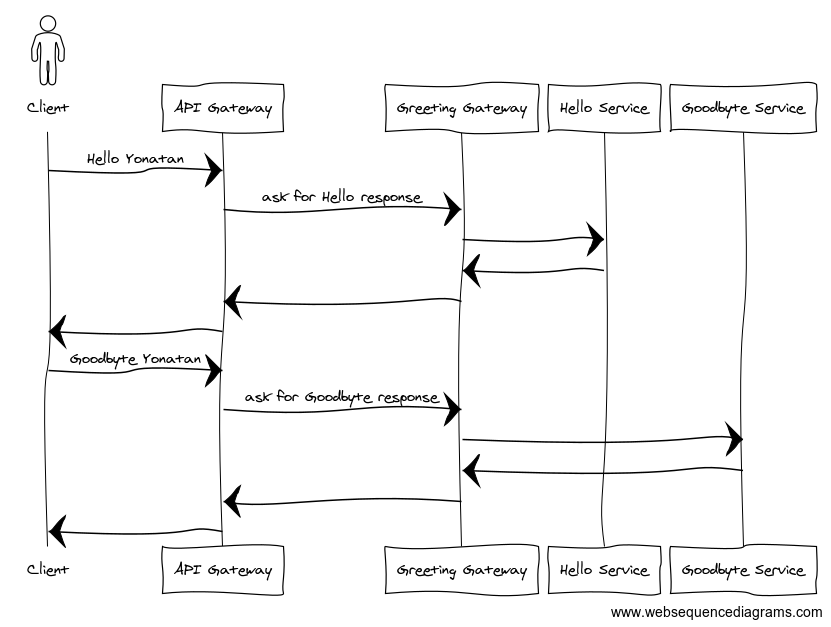
For simplicity, let’s assume that we have only two services in our domain. Each service serves a single endpoint that is unrelated to the other. The illustration below shows an example of how our client will integrate with our domain:
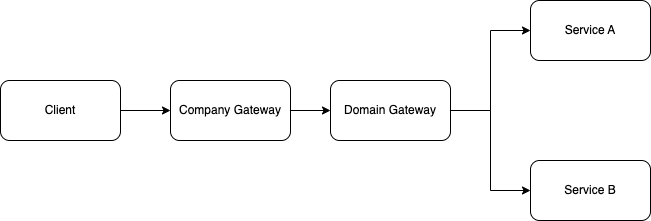
If we look at the service structure of our domain, it would look something like this:
API Specs
Hello Service
Our Hello API will expose a single endpoint: /hello/{name}. This endpoint will respond to the client with “Hello <NAME>” (e.g. “Hello Yonatan“).
openapi: 3.0.3
info:
  title: Hello API
  description: A service greeting with Hello World
  version: 1.0.0

tags:
  - name: Hello

paths:

  /hello/{name}:
    get:
      operationId: hello
      summary: Returns hello + user name
      tags:
        - Hello
      parameters:
        - in: path
          name: name
          schema:
            type: string
          required: true
      responses:
        "200":
          description: |
              Successfully returning hello + user name to the client.
          content:
            application/json:
              schema:
                $ref: "#/components/schemas/HelloResponse"

components:
  schemas:
    HelloResponse:
      type: object
      required:
        - value
      properties:
        value:
          type: string
          example: "Hello world"
Goodbye Service
Our Goodbye API is exactly like the Hello API. It contains a single endpoint: /goodbye/{name}. This endpoint, just like the Hello API, responds to the client with Goodbye <NAME> (e.g. Goodbye Yonatan).
openapi: 3.0.3
info:
  title: Goodbye API
  description: A service greeting with Hello World
  version: 1.0.0

tags:
  - name: Goodbye

paths:

  /goodbye/{name}:
    get:
      operationId: goodbye
      summary: Returns goodbye + user name
      tags:
        - Goodbye
      parameters:
        - in: path
          name: name
          schema:
            type: string
          required: true
      responses:
        "200":
          description: |
              Successfully returning goodbye + name to the client.
          content:
            application/json:
              schema:
                $ref: "#/components/schemas/GoodbyeResponse"

components:
  schemas:
    GoodbyeResponse:
      type: object
      required:
        - value
      properties:
        value:
          type: string
          example: "Goodbye world"
Domain Gateway Service
The greeting API acts as a facade for the two services above. It includes two API endpoints:
/hello/{name}/goodbye/{name}
openapi: 3.0.3
info:
  title: Gateway API
  description: A service greets the user
  version: 1.0.0

tags:
  - name: Gateway

paths:

  /hello/{name}:
    get:
      operationId: hello
      summary: Returns hello + user name
      tags:
        - Gateway
      parameters:
        - in: path
          name: name
          schema:
            type: string
          required: true
      responses:
        "200":
          description: |
              Successfully returning hello + user name to the client.
          content:
            application/json:
              schema:
                $ref: "#/components/schemas/HelloResponse"

  /goodbye/{name}:
    get:
      operationId: goodbye
      summary: Returns goodbye + user name
      tags:
        - Gateway
      parameters:
        - in: path
          name: name
          schema:
            type: string
          required: true
      responses:
        "200":
          description: |
              Successfully returning goodbye + name to the client.
          content:
            application/json:
              schema:
                $ref: "#/components/schemas/GoodbyeResponse"

components:
  schemas:
    HelloResponse:
      type: object
      required:
        - value
      properties:
        value:
          type: string
          example: "Hello world"

    GoodbyeResponse:
      type: object
      required:
        - value
      properties:
        value:
          type: string
          example: "Goodbye world"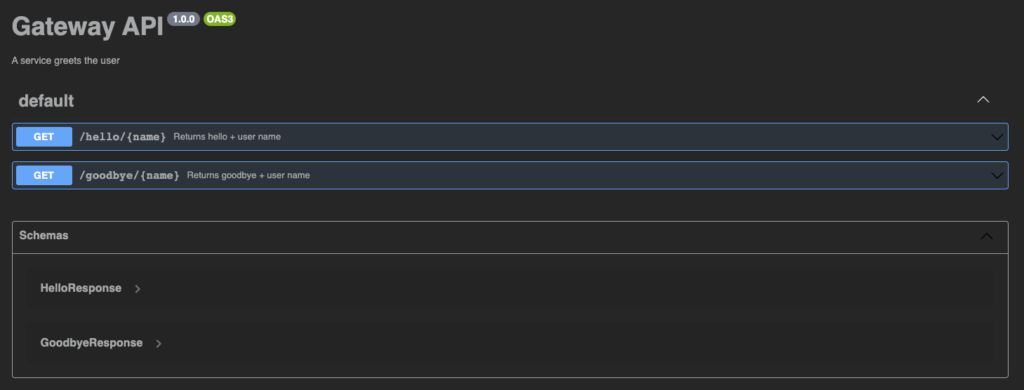
Generating Multiple Specs
We will locate all the above specs in our /resource/api directory with the following names:
hello-api.yamlgoodbye-api.yamlgateway-api.yaml
We will reuse the same setup we used in the previous article. However, we would like to amend it so that we can generate an unlimited number of specs. If you need an explanation of how to configure the OpenAPI Gradle plugin, please refer to our previous article.
The first step is to introduce a new class into our Gradle build script. This class will hold all the required information about the spec.
/**
 * A class represents a specific spec to generate.
 */
data class ApiSpec(
    val name: String,
    val taskName: String,
    val directoryPath: String,
    val outputDir: String,
    val specFileName: String,
    val generatorType: String,
    val packageName: String,
    val modelPackageName: String,
    val config: Map<String, String>,
    val templateDir: String? = null
)
Now, we will create a list of all the specs we want to generate in our build.gradle.kts:
/**
 * List of all api specs to generate
 */
val supportedApis = listOf(
    ApiSpec(
        name = "Gateway API",
        taskName = "generateGatewayApi",
        directoryPath = apiDirectoryPath,
        templateDir = "$apiDirectoryPath/templates/kotlin-spring",
        outputDir = "$openApiGenerateOutputDir/domain-gateway",
        specFileName = "gateway-api.yaml",
        generatorType = "kotlin-spring",
        packageName = "com.yonatankarp.gateway.openapi.v1",
        modelPackageName = "com.yonatankarp.gateway.openapi.v1.models",
        config = mapOf(
            "dateLibrary" to "java8",
            "interfaceOnly" to "true",
            "implicitHeaders" to "true",
            "hideGenerationTimestamp" to "true",
            "useTags" to "true",
            "documentationProvider" to "none",
            "reactive" to "true",
            "useSpringBoot3" to "true",
        )
    ),
    ApiSpec(
        name = "Hello API",
        taskName = "generateHelloApi",
        directoryPath = apiDirectoryPath,
        outputDir = "$openApiGenerateOutputDir/domain-gateway",
        specFileName = "hello-api.yaml",
        generatorType = "kotlin",
        packageName = "com.yonatankarp.hello.openapi.v1_current",
        modelPackageName = "com.yonatankarp.hello.openapi.v1_current.models",
        config = mapOf(
            "dateLibrary" to "java8",
            "interfaceOnly" to "true",
            "implicitHeaders" to "true",
            "hideGenerationTimestamp" to "true",
            "useTags" to "true",
            "documentationProvider" to "none",
            "serializationLibrary" to "jackson",
            "useCoroutines" to "true",
            "library" to "jvm-retrofit2"
        )
    ),
    ApiSpec(
        name = "Goodbye API",
        taskName = "generateGoodbyeApi",
        directoryPath = apiDirectoryPath,
        outputDir = "$openApiGenerateOutputDir/domain-gateway",
        specFileName = "goodbye-api.yaml",
        generatorType = "kotlin",
        packageName = "com.yonatankarp.goodbye.openapi.v1_current",
        modelPackageName = "com.yonatankarp.goodbye.openapi.v1_current.models",
        config = mapOf(
            "dateLibrary" to "java8",
            "interfaceOnly" to "true",
            "implicitHeaders" to "true",
            "hideGenerationTimestamp" to "true",
            "useTags" to "true",
            "documentationProvider" to "none",
            "serializationLibrary" to "jackson",
            "useCoroutines" to "true",
            "library" to "jvm-retrofit2"
        )
    )
)
ℹ️ For SpringBoot 2 users, make sure to remove the useSpringBoot3 flag from your code completely in Gateway API, as the generator ignores the value in the map and only checks if the flag is present.
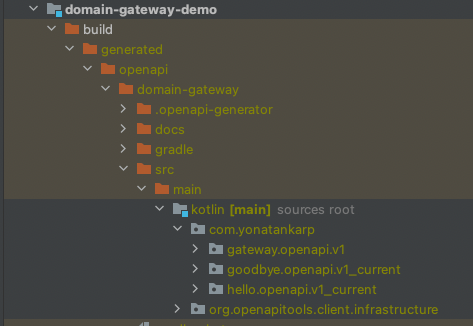
You might notice that all of our specs are generated into the same output directory. This is because OpenAPI generates some infrastructure classes that are used by the generated code. If we do not generate them in the same directory, the sourceDir will include duplications of classes in the same packages, and the code will not compile. You can see that we are still separating our APIs by package name in the generated code:
Add Generated Code To Project
The next step is defining some generic functions that will:
- Register a new task for each spec to generate the code.
- Add the generated code to the source set.
- Ensure that the
cleantask is finalized by the generation task of the spec. - Make
compileKotlindepend on the generation task of the spec.
We will start by creating the tasks for each of our specs under the openapi tools group:
// Iterate over the API list and register them as generator tasks
supportedApis.forEach { api ->
    tasks.create(api.taskName, GenerateOpenApiTask::class) {
        group = "openapi tools"
        description = "Generate the code for ${api.name}"

        generatorName.set(api.generatorType)
        inputSpec.set("${api.directoryPath}/${api.specFileName}")
        outputDir.set(api.outputDir)
        apiPackage.set(api.packageName)
        modelPackage.set(api.modelPackageName)
        configOptions.set(api.config)
        api.templateDir?.let { this.templateDir.set(it) }
    }
}
The next step is adding our generated code from the previous tasks to our sourceSet. We are using the first element in the list since all of our files are generated into the same output directory.
supportedApis.first().let {
    sourceSets[SourceSet.MAIN_SOURCE_SET_NAME].java {
        srcDir("${it.outputDir}/src/main/kotlin")
    }
}
The last step is to ensure that the clean task and compileKotlin work well with the new tasks. We will create a new task called cleanGeneratedCodeTask that will delete all generated code whenever the clean task is run. Additionally, we want to ensure that all code generation tasks have been executed before building our code.
tasks {
    register("cleanGeneratedCodeTask") {
        description = "Removes generated Open API code"
        group = "openapi tools"

        doLast {
            logger.info("Cleaning up generated code")
            File(openApiGenerateOutputDir).deleteRecursively()
        }
    }

    clean {
        dependsOn("cleanGeneratedCodeTask")
        supportedApis.forEach { finalizedBy(it.taskName) }
    }

    compileKotlin {
        supportedApis.forEach { dependsOn(it.taskName) }
    }
}
As you can see, now all of our tasks are available for use in Gradle:

The last thing we need to do is add some dependencies to our build.gradle.kts to ensure that our code can be compiled.
dependencies {
    api("com.squareup.retrofit2:retrofit:$retrofitVersion")
    api("com.squareup.retrofit2:converter-jackson:$retrofitVersion")
    api("com.squareup.okhttp3:logging-interceptor:$okHttpVersion")
}
Using The Generated Code
Clients Definition
We will start by defining our OkHttp client. Note that I am setting the logger interceptor level to BODY. This is great for debugging, but NEVER use it in production as it will log all request and response bodies. This may expose sensitive information in your logs. If you still want to log your request/response body, you need to build a custom interceptor.
private fun okHttpClient() =
    OkHttpClient
        .Builder()
        .addInterceptor(HttpLoggingInterceptor().apply { level = BODY })
        .build()
Next, we will define beans for our two API clients. To make sure that the Jackson object mapper comes from the generated code is configured correctly, we will also inject the list of converter factories to the beans:
@Bean
fun helloApiClient(
    converterFactories: List<Factory>,
): HelloApi =
    ApiClient(
        baseUrl = helloServiceBaseURL,
        okHttpClientBuilder = okHttpClientBuilder(),
        converterFactories = converterFactories,
    ).createService(HelloApi::class.java)

    @Bean
    fun goodbyeApiClient(
        converterFactories: List<Factory>,
    ): GoodbyeApi =
        ApiClient(
            baseUrl = goodbyeServiceBaseURL,
            okHttpClientBuilder = okHttpClientBuilder(),
            converterFactories = converterFactories,
        ).createService(GoodbyeApi::class.java)
ℹ️Alternatively, you can inject the object mapper from the Spring context directly into the ApiClient constructor as serializerBuilder
So, our final configuration class would look like this:
@Configuration
class DomainGatewayConfig(
    @Value("\${hello-service.base-url}")
    private val helloServiceBaseURL: String,
    @Value("\${goodbye-service.base-url}")
    private val goodbyeServiceBaseURL: String,
) {
    private fun okHttpClientBuilder() =
        OkHttpClient
            .Builder()
            .addInterceptor(
                HttpLoggingInterceptor()
                    .apply { level = BODY },
            )

    @Bean
    fun helloApiClient(
        converterFactories: List<Factory>,
    ): HelloApi =
        ApiClient(
            baseUrl = helloServiceBaseURL,
            okHttpClientBuilder = okHttpClientBuilder(),
            converterFactories = converterFactories,
        ).createService(HelloApi::class.java)

    @Bean
    fun goodbyeApiClient(
        converterFactories: List<Factory>,
    ): GoodbyeApi =
        ApiClient(
            baseUrl = goodbyeServiceBaseURL,
            okHttpClientBuilder = okHttpClientBuilder(),
            converterFactories = converterFactories,
        ).createService(GoodbyeApi::class.java)
}
Now, we can call our endpoints using the clients as follows:
helloApi.hello(name)
goodbyeApi.goodbye(name)
Domain Gateway Definition
We will now define a mapper from the OpenAPI (network network) object layer, to the service (domain) object layer:
object HelloMapper {
    fun Response<HelloServerResponse>.toResponse(): ResponseEntity<Any> =
        HelloResponse(value = this.body()?.value ?: "Unknown")
            .let { ResponseEntity.ok(it) }
}

object GoodbyeMapper {
    fun Response<GoodbyeServiceResponse>.toResponse(): ResponseEntity<Any> =
        GoodbyeResponse(value = this.body()?.value ?: "Unknown")
            .let { ResponseEntity.ok(it) }
}
Lastly, we will define our REST controller. The domain gateway controller implementation is very simple. It is a Spring @RestController that implements a given interface. Our code would look like this:
@RestController
class DomainGatewayController(
    private val helloApi: HelloApi,
    private val goodbyeApi: GoodbyeApi,
) : GatewayApi<Any> {
    override suspend fun hello(name: String): ResponseEntity<Any> =
        helloApi.hello(name).toResponse()

    override suspend fun goodbye(name: String): ResponseEntity<Any> =
        goodbyeApi.goodbye(name).toResponse()
}
Hello and Goodbye Service Definition
The services in this article will implement the exact same structure as shown in the article How to Use OpenApi to Build a Robust RESTful API, hence, we will skip the implementation itself. Follow the article for more details. Alternatively, visit the GitHub repository for the Hello Service and the Goodbye Service implementation.
For the sake of completeness, we will show the implementation of the HelloController that implements the generated code of OpenApi:
@RestController
class HelloController : HelloApi<HelloResponse> {
    override suspend fun hello(name: String): ResponseEntity<HelloResponse> =
        HelloResponse("Hello, $name!")
            .let { ResponseEntity.ok(it) }
}
Run The Code
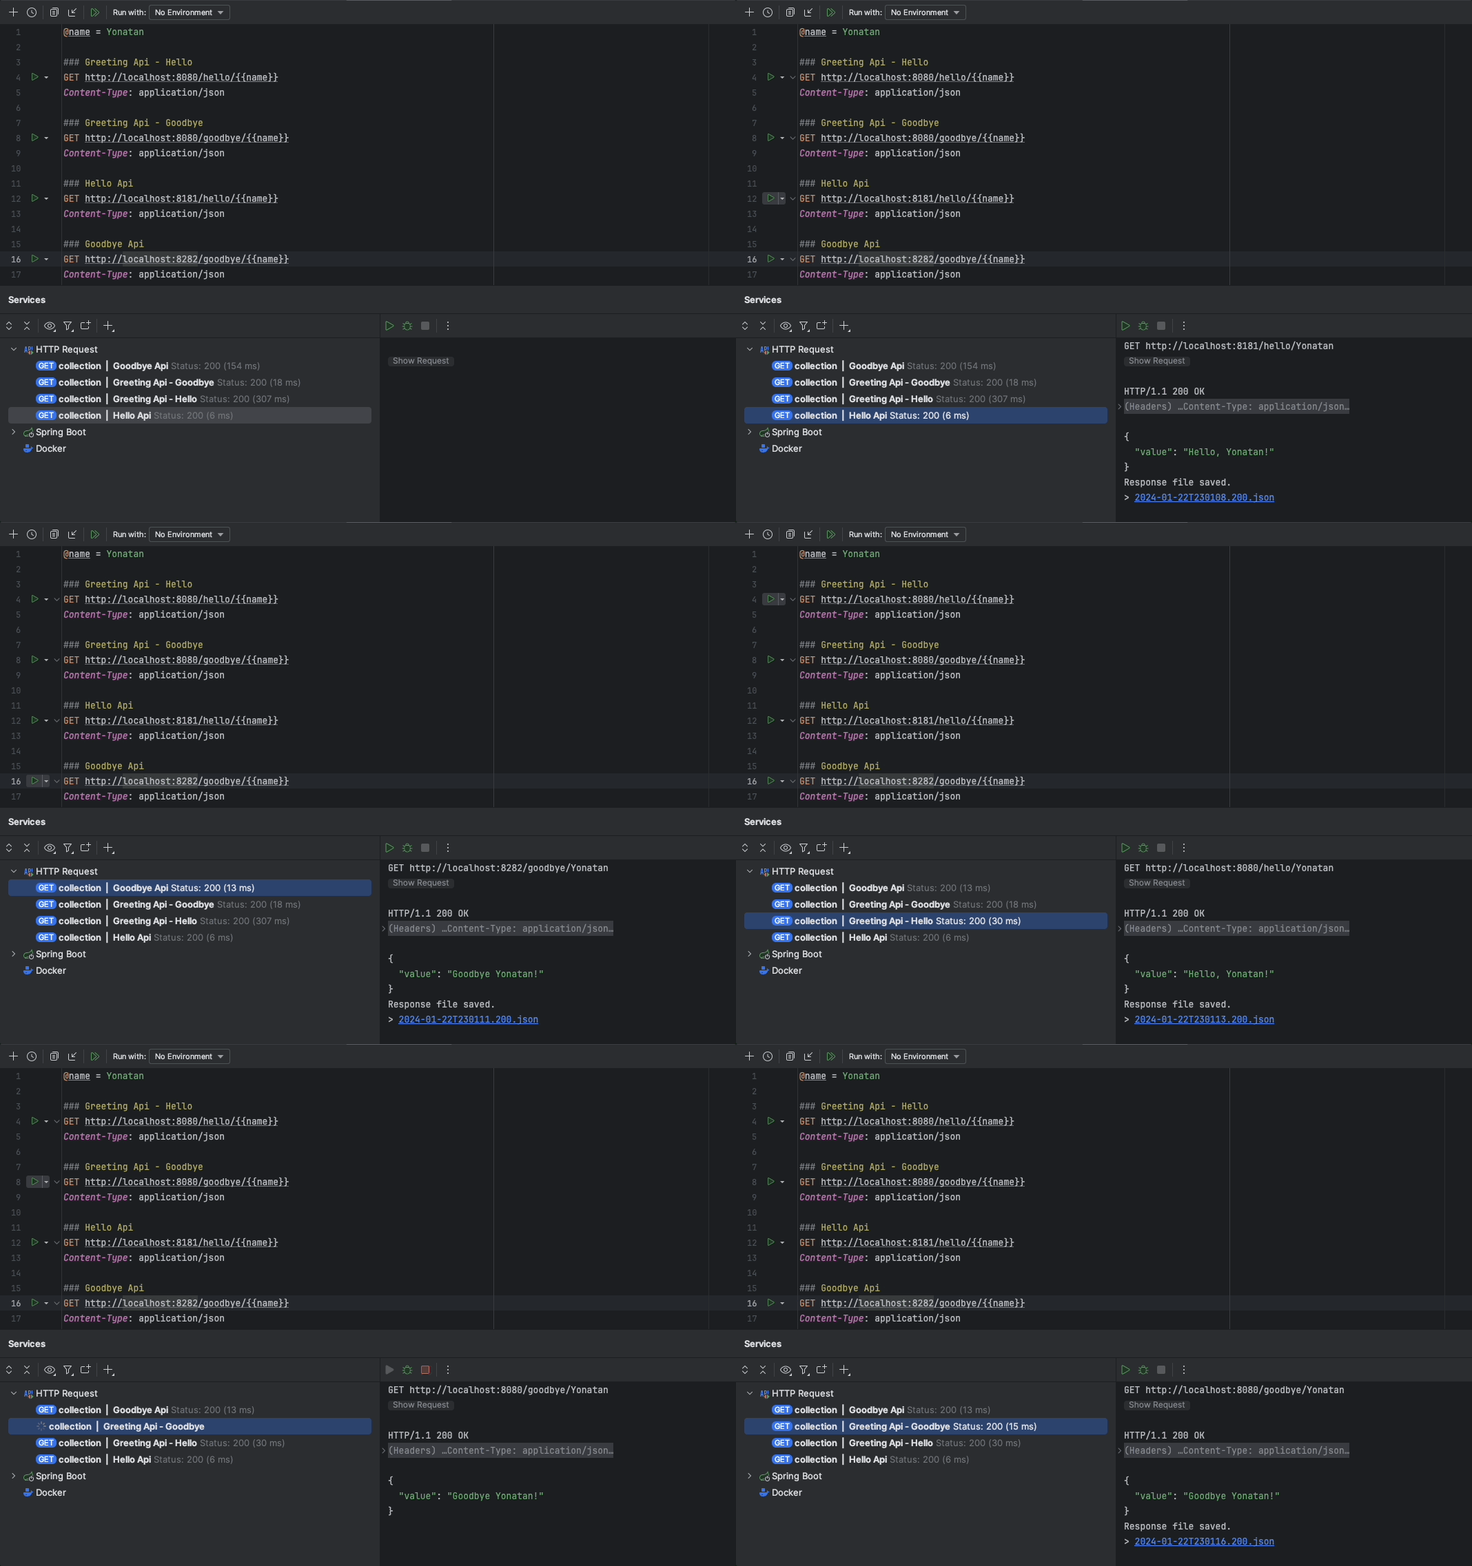
Once we have all 3 services implemented, we can call each of the services individually, or call the combined API via our domain gateway. As you can see in the illustration below:
Alternatively, you can use springdoc library to publish an HTML version of your spec that is interactable from your service, but that’s a story for another article.
Conclusion
In this article, I have explained the benefits of aggregating your services into a domain gateway. We have used the power of OpenAPI to ensure the robustness of our API, both publicly (for our clients) and internally (between our services).
All code examples in this article are available in my GitHub repository: https://github.com/yonatankarp/domain-gateway-demo
More Information
- API Versioning with Kotlin and Spring Boot by Mariusz Sołtysiak: An article by a colleague of mine about API versioning used in their domain gateway.
Credits
- Photos by Robert Lukeman, Lachlan Donald and Geranimo on Unsplash.


Hazel Lovette
There is definately a lot to learn about this topic.
I love all of the points you have made.
Yonatan Karp-Rudin
Thank you very much for your feedback!
Indeed this opens a much bigger discussion with many new points to take into account.
I’m really happy that you’ve enjoyed it! 🙏