


Editor’s Note: This post was originally written by me and published on SumUp’s blog. However, a lot has changed since then. I am no longer working for SumUp, OpenAPI has released two major versions, Spring Boot has had a major release, and even Gradle has had multiple major releases. Not only that, but my writing skills have improved dramatically since then, and over time, I have found some small mistakes in the original article. Since the original article is one of my most successful, I decided to rewrite it and publish an updated version.
Introduction
RESTful API – The Ugly Part
As a backend engineer, I have developed numerous REST APIs during my career. One of the most annoying issues I faced repeatedly was the lack of smooth integration between the backend and clients. Typos in URLs, inconsistent casing in JSON (camel case vs. snake case), passing values of the wrong type (e.g., string instead of an integer), and other similar mistakes have happened to me multiple times.

Use OpenAPI Spec for Our New API
In 2019, my team at the time had to design a new API that would integrate with multiple clients: mobile (Android & iPhone), web, and other backend services. We aimed to make the integration process as seamless as possible while ensuring the robustness of the API definition. During our brainstorming sessions, we decided to use OpenAPI [link] (formerly known as Swagger) from the beginning. Although I was already familiar with Swagger as a documentation tool, this time we chose to build the API in reverse. As a result, we started by defining the API specification with all the endpoints, requests, and responses first. Each team responsible for integration (backend, mobile, and web) then used the OpenApi generator [link] to auto-generate the code they needed, including models, network layers, or controllers. Because of the usage of these generated code components in our codebase, we eliminated room for errors.
OpenAPI Adaptation for Better Integration
This design approach proved to be a great success. In fact, we replicated the same process for new APIs and witnessed other teams adopting OpenAPI for their APIs as well. It became so popular within the company that OpenAPI was officially adopted as the standard for describing all our APIs. This made it easier for both internal and external integrators to adopt our APIs.
ℹ️ OpenAPI integration was so powerful that in my new job, I introduced the same pattern. The team used OpenAPI to generate documentation from code, but my suggestion was to reverse the process, as described in this article.
The Article’s Objectives
In this article, I will demonstrate an example of a short and simple API and walk you through the process we followed to create a working REST API. For this demonstration, we will use the following technology stack: Spring Boot, Kotlin, and Gradle’s Kotlin DSL alongside (of course) OpenApi generator. However, OpenAPI supports various other languages, and I chose this stack for the sake of this example. You can find the full list of supported languages here.
Step 1: Use OpenAPI Editor to Design Our API
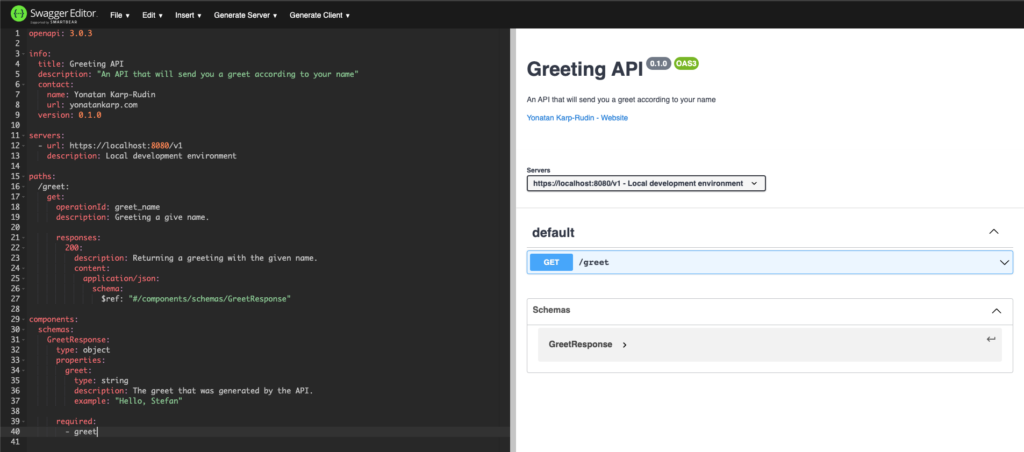
We will begin with designing the API. Our API will have a single endpoint: /greet. This endpoint would accept a name as a query parameter (for example: /greet?name=Yonatan). It will respond with a greeting “Hello” followed by the provided name.
To define our API, we can use the Swagger Editor [link] to detect any syntax errors in advance. If you are using IntelliJ IDEA, you can also utilize the OpenAPI Editor plugin [link].
Let’s start by looking at our OpenApi specification, and then we will break it down step by step to understand each of the different parts of it.
openapi: 3.0.3

info:
  title: Greeting API
  description: "An API that sends a greeting based on a provided name"
  contact:
    name: Yonatan Karp-Rudin
    url: https://yonatankarp.com
  version: 0.1.0

tags:
  - name: Greeting

servers:
  - url: http://localhost:8080/v1
    description: Local development environment

paths:
  /greet:
    get:
      operationId: greet_name
      description: Greet a given name.
      tags:
        - Greeting

      parameters:
        - in: query
          name: name
          schema:
            type: string
          required: false
          description: The name to greet. If no name is provided, the API will greet the world.

      responses:
        200:
          description: Returns a greeting with the provided name.
          content:
            application/json:
              schema:
                $ref: "#/components/schemas/GreetResponse"

components:
  schemas:
    GreetResponse:
      type: object
      properties:
        greet:
          type: string
          description: The greeting from the API.
          example: "Hello, Yonatan!"

      required:
        - greet
API Information
The info section’s responsibility is to provide details about the API. The information would appear at the top of the generated documentation HTML page. This includes the API’s title, description, and contact information. You can find additional attributes to include in this section in the API General Info documentation.
Servers
The servers section lists the available environments (e.g. dev, staging, and production) for users to select when referring to the API documentation.
servers:
	 - url: https://dev.env
	   description: The development environment.
	 - url: https://staging.env
	   description: The staging environment.
	 - url: https://production.env
	   description: The production environment.
Endpoints
The paths section defines the different endpoints of our API, including their HTTP methods, request parameters, and responses.
Models
In the components section, we define the API models. In our case, we define a response model for an endpoint with a single field. Note that this field is marked as required and therefore it will be generated as a not-nullable type in Kotlin using the OpenAPI generator. The components section can include additional information, such as security schemas (authentication method, required headers, etc).
Step 2: Use OpenApi Generator to Create the Code

Setting Up OpenAPI Spec to The Project
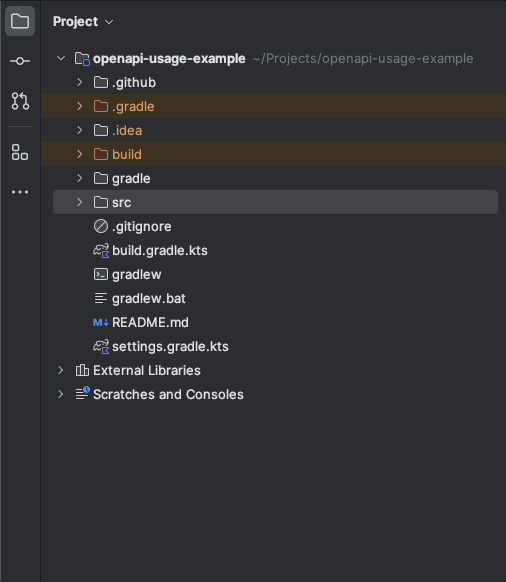
To generate our code, we will use the OpenAPI Generator, specifically the OpenAPI Generator Gradle plugin [link]. First, we will create an API specification for our project. We will start by creating a api directory at the project root and save the specification in a spec.yml file. Your project structure should resemble this:
Setting Up OpenAPI Generator with Gradle Plugin
Now, let’s add the OpenAPI Generator plugin to our project. Open your build.gradle.kt file and include the following plugin:
plugins {
   id("org.openapi.generator") version "7.2.0"
}
Next, configure the Gradle plugin to work with the settings we defined. We will generate our models into the build directory, ensuring that the auto-generated code is not committed to our project repository.
val apiDirectoryPath = "$projectDir/src/main/resources/api"
val openApiGenerateOutputDir =
    "${layout.buildDirectory.get()}/generated/openapi"


openApiGenerate {
    generatorName = "kotlin-spring"
    inputSpec = "$apiDirectoryPath/spec.yml"
    outputDir = openApiGenerateOutputDir
    apiPackage = "com.yonatankarp.openapi"
    modelPackage = "com.yonatankarp.openapi.models"
    configOptions =
        mapOf(
            "dateLibrary" to "java8",
            "interfaceOnly" to "true",
            "implicitHeaders" to "true",
            "hideGenerationTimestamp" to "true",
            "useTags" to "true",
            "documentationProvider" to "none",
            "reactive" to "true",
            "useSpringBoot3" to "true",
        )
}
You can find the available generator flags in the documentation.
ℹ️ For SpringBoot 2 users, make sure to remove the useSpringBoot3 flag from your code completely, as the generator ignores the value in the map and only checks if the flag is present.
Resolving Code Errors & Adding Dependencies
After the generation of the code, you might notice that the code currently shows errors due to the missing jakarta.validation package (or javax.validation for SpringBoot 2 users). To resolve this, add the following dependency to your build.gradle.kt file:
dependencies {
    implementation("org.springframework.boot:spring-boot-starter-validation")
}
Customizing OpenAPI Generator with Templates
Note that you can override the generator’s default templates if needed. You can copy the templates from the generator repository, modify them, and set them in the plugin using the templateDir property.
openApiGenerate {
    templateDir = "$apiDirectoryPath/templates"
}
For more information about the plugin’s configurations click here.
Ensure Clean Build with Gradle
It’s also recommended to add the following code to ensure that running the clean command removes the generated code as well. Additionally, make any Kotlin compilation command (e.g. build or assmble) command depends on the OpenAPI generation task to generate the latest code before the build.
tasks {
    register("cleanGeneratedCodeTask") {
        description = "Removes generated Open API code"

        doLast {
            File(openApiGenerateOutputDir).deleteRecursively()
        }
    }

    clean { dependsOn("cleanGeneratedCodeTask") }
}

tasks.withType<KotlinCompile> {
    dependsOn("openApiGenerate")
}
Include Generated Code into Project Classpath
Now, we need to add our newly generated code to the classpath of our project.
sourceSets.main {
    kotlin {
        srcDir("$openApiGenerateOutputDir/src/main/kotlin")
    }
}
Generating Code with Gradle Build
Running the build command in Gradle should generate the code in your project files, similar to the following:
Step 3: Implementation of the API! 🎉

Implementing The Code
This step is the easiest so far. We will implement our generated interface, GreetingApi in our controller. Let’s write the code!
@RestController
class GreetingApiController : GreetingApi {

    override fun greetName(
        @RequestParam(value = "name", required = false) name: String?
    ): ResponseEntity<GreetResponse> =
        if (name.isNullOrBlank())
            ResponseEntity.ok(GreetResponse("Hello, world!"))
        else
            ResponseEntity.ok(GreetResponse("Hello, $name!"))
}
Running & Testing the Server
We can now run our server and test it by requesting the browser:
Step 4: Writing Tests
Introduction to API Testing
Finally, let’s add some tests for our API. Since there’s no business logic in this example, we will only include an integration test to cover the complete flow. However, in your production code, it is highly recommended to cover your business logic with unit tests as well. We will utilize JUnit 5’s @ParameterizedTest functionality to avoid code duplication. It will allow us to reuse the same test with different inputs to ensure the behavior of our code.
Writing the Integration Test Code
@TestInstance(TestInstance.Lifecycle.PER_CLASS)
@SpringBootTest
@AutoConfigureMockMvc
@WebAppConfiguration
class GreetingApiControllerTest(context: WebApplicationContext) {
    private val mockMvc = MockMvcBuilders
        .webAppContextSetup(context).build()

    @ParameterizedTest(name = """should return {1} for name "{0}"""")
    @MethodSource("getTestCase")
    fun `should return correct greeting`(name: String?, expectedResult: String) {

        val uri = if (name.isNullOrBlank()) "/v1/greet"
        else "/v1/greet?name=$name"

        val request = MockMvcRequestBuilders.get(uri)
            .accept(MediaType.APPLICATION_JSON)

        val response =
            mockMvc
                .perform(request)
                .andExpect(MockMvcResultMatchers.status().isOk)
                .andReturn()
                .response
                .contentAsString

        val actualGreeting = ObjectMapper()
            .readTree(response)["greet"]
            .asText()
        assertEquals(expectedResult, actualGreeting)
    }

    companion object {
        @JvmStatic
        private fun getTestCase() =
            arrayOf(
                Arguments.of("test", "Hello, test!"),
                Arguments.of(null, "Hello, world!"),
                Arguments.of("💩", "Hello, 💩!"),
            )
    }
}
Running and Verifying the Tests
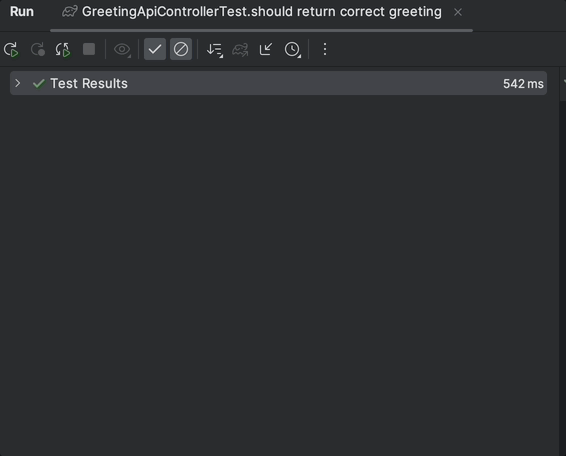
If you have followed the instructions correctly, running the test should result in two passing tests! 🎉
You can find the complete code for this project on my GitHub repository. Feel free to explore it here.
Conclusion
By using OpenApi, you can allow yourself, your team, and your potential clients a smoother, more robust, and efficient integration process. You can always use this approach when designing a new API (by applying the API first principle), considering it for existing API to ensure the robustness of your system and future integrators with it.
Credits
- Photos by Adam Kool, Karsten Würth, and Jefferson Santos on Unsplash.
1 Pingback