


Introduction
In this article, we’ll dive into the steps for adding observability to your codebase using OpenTelemtry. Initially, we’ll develop a library that retrieves data from a remote API. Following that, we’ll construct a service using this library to fetch and save this data in a database.
As we progress, we’ll infuse OpenTelemtry into our Kotlin backend service, demonstrating their behavior in an environment resembling production. Once the service is equipped with instrumentation, we’ll introduce a filter to it that dismisses overly large requests. This filter, too, will be instrumented.
All code examples for this series are available on GitHub:
Introduction to Service Instrumentation
What is service instrumentation? And why do I need it?
Service instrumentation is the process of collecting data from different components in your system (e.g. services) to benefit insights into the system’s performance, behavior, and usage. This data can be used to optimize the system, troubleshoot, and improve the user experience.
More specifically, we will use OpenTelemetry [Link]. OpenTelemetry documentation states:
OpenTelemetry, also known as OTel for short, is a vendor-neutral open-source Observability framework for instrumenting, generating, collecting, and exporting telemetry data such as traces, metrics, logs. As an industry-standard, it is natively supported by a number of vendors.
That means that OpenTelemetry is a framework that allows you to easily add instrumentation to your codebase and collect the data in a vendor-agnostic way. It supports multiple programming languages and provides a unified API for collecting and exporting telemetry data to various backends.
OpenTelemetry also provides a set of libraries and integrations that make it easy to instrument popular frameworks, libraries, and services. With OpenTelemetry, developers can easily add telemetry to their services and gain visibility into their systems’ performance and behavior.
For more information about observability, check out a great article “How Observability Changed My (Developer) Life” written by a colleague of mine, Mariusz Sołtysiak.
Part 1 – Building the Client Library
We’ll kick off by developing our client library named cat-fact-client. This library will fetch cat facts from the Cat Facts API.
At its core, our library is straightforward. It endeavors to fetch a specified number of facts. While the API restricts fact selection, we compensate by invoking the API multiple times, as required, making the best effort to serve the requested number of facts.
Our library will utilize:
- Kotlin – The crux of our library, it will be scripted in Kotlin using coroutines.
- Gradle – Our trusted build system and dependency manager.
- Retrofit – Our choice for an HTTP client.
- Jackson – Essential for serialization, particularly as we’ll be integrating with Spring Boot which defaults to Jackson.
Let’s get coding!
Adding Dependencies
Kick-off by adding the essential dependencies to the build.gradle.kts file:
dependencies {
    // Coroutines
    implementation("org.jetbrains.kotlinx:kotlinx-coroutines-core:1.8.1")

    // Serialization
    implementation("com.fasterxml.jackson.module:jackson-module-kotlin:2.17.1")

    // Retrofit
    api("com.squareup.okhttp3:okhttp:4.12.0")
    api("com.squareup.retrofit2:retrofit:2.11.0")
    api("com.squareup.retrofit2:converter-jackson:2.11.0")
}
Domain Modeling
When you ping the Cat Facts API, expect a response similar to:
{"fact":"Cats have \"nine lives\" thanks to a flexible spine and powerful leg and back muscles","length":83}Our primary concern is the fact field. To determine the fact length, we simply utilize fact.length. This gives rise to our model:
data class Fact(val value: String)By leveraging Kotlin’s value class, we optimize resource utilization. While we interact solely with Fact objects, these objects are substituted with String objects during compilation.
Thus, we revised our code to:
@JvmInline
value class Fact(val value: String)
Constructing the HTTP Client
Having established our domain model, it’s time to construct an HTTP client for API calls.
This would be our client’s blueprint:
import com.fasterxml.jackson.annotation.JsonIgnoreProperties
import retrofit2.http.GET

internal interface CatFactClient {
    @GET("fact")
    suspend fun fact(): CatFactResponse
}

@JsonIgnoreProperties(ignoreUnknown = true)
internal data class CatFactResponse(
    val fact: String,
)
You’ll observe a solitary function, fact(), geared towards API communication, yielding a CatFactResponse. We’ve intentionally omitted the length field, as highlighted earlier.
Connecting everything together
With foundational pieces in place, let’s merge them to manifest our core library logic.
Commence by configuring an instance of the HTTP client:
private const val API_BASE_URL = "https://catfact.ninja/"

private var client = Retrofit.Builder()
    .baseUrl(API_BASE_URL)
    .client(OkHttpClient.Builder().build())
    .addConverterFactory(JacksonConverterFactory.create(objectMapper))
    .build()
    .create<CatFactClient>()
Now, our business logic:
override suspend fun get(numberOfFacts: Int): Set<Fact> =
    coroutineScope {
        (1..numberOfFacts).map {
            async { client.fact() }
        }.awaitAll()
            .map { Fact(it.fact) }
            .toSet()
    }
This function concurrently dispatches numberOfFacts calls to the API, awaits all replies, translates them into the domain model, and returns a fact set. We utilize Set over List since the API doesn’t assure unique responses.
Inspect the finalized version of the code here.
This piece isn’t tailored to guide library publishing. However, if you’re inclined, relevant settings can be found here.
Our library’s artifact, version 0.1.0, is available on GitHub packages and awaits your exploration. An updated version (0.2.0) offers mock implementations, bypassing internet prerequisites with a few breaking changes. Nevertheless, the core remains unaltered
Part 2 – Building the Service
All code examples related to this service are available here on the branch business-logic-implementation.
The service includes the following features:
- Each request returns a specified number of cat facts (between 1-10) using the
cat-fact-clientlibrary, If not specified, the default is 5 facts - Each fact is saved to the database unless it’s already stored.
- The retrieved facts are then sent back to the caller.
You might wonder, “When would I ever need this?!” This is primarily a demonstrative use case. Imagine a scenario where instead of accessing a facts API, you’re calling a user management service to ensure a user’s context is saved in the request.
Various methods can deliver this functionality. Here, we will utilize Spring’s @Scope for a bean that’s instantiated for every new service request.
Adding Dependencies
To integrate our library, append the following dependency to the project:
repositories {
    maven {
        url = uri("https://maven.pkg.github.com/yonatankarp/cat-fact-client")
        credentials {
            username = project.findProperty("gpr.user")?.toString() ?: System.getenv("GITHUB_ACTOR")
            password = project.findProperty("gpr.key")?.toString() ?: System.getenv("GITHUB_TOKEN")
        }
    }
}
Ensure you have a PAT (Personal Access Token) with the read:packages privilege to access the library. Detailed instructions on generating a PAT can be found here.
Subsequently, insert the dependency into the project:
dependencies {
    implementation("com.yonatankarp:cat-fact-client:0.2.0")
}
After refreshing your Gradle project, if configured appropriately, the library should be available.
Loading the Facts
We begin by defining the RequestContext interface, which will load facts for each request. Spring will use its implementation, RequestContextImpl, to inject facts into the controller.
/**
 * Provides facts about cats into the request context.
 *
 * This interface is used by SpringBoot to inject the user context into
 * the controller for each call made for the service.
 */
interface RequestContext {
    var facts: Set<Fact>?
}

/**
 * The implementation of the [RequestContext] interface. Used by
 * SpringBoot to populate the facts into the request context.
 */
open class RequestContextImpl(
    override var facts: Set<Fact>? = null
) : RequestContext
We will now configure our context to be included with each request arriving at the service. Note that we’re using Jackson’s ObjectMapper for the cat-fact-client library, as this is the default serialization library for Spring. Moreover, the @Scope annotation requires a none-suspended function, and therefore we have to use the runBlocking{} to bridge between the library and our service.
@Configuration
class ApplicationConfiguration {
    /**
     * Creates a new instance of the [CatFactProvider] that will be
     * used to fetch the facts about cats.
     */
    @Bean
    fun catFactProvider(objectMapper: ObjectMapper): CatFactProvider =
        CatFactFactory.getInstance(ProviderType.API, objectMapper)

    /**
     * Creates a new instance of the [RequestContext] that will be
     * used to inject the facts into the request context.
     */
    @Bean
    @Scope(
        WebApplicationContext.SCOPE_REQUEST,
        proxyMode = ScopedProxyMode.INTERFACES
    )
    fun requestContext(
        catFactProvider: CatFactProvider
    ): RequestContext = runBlocking {
        RequestContextImpl(catFactProvider.get(getMaxFactsNumber()))
    }

    /**
     * Returns the maximum number of facts that should be returned
     * to the caller, or the default value if not specified.
     */
    private fun getMaxFactsNumber(): Int {
        val servletRequestAttributes =
            RequestContextHolder.getRequestAttributes() as ServletRequestAttributes

        return servletRequestAttributes
            .request
            .getParameterValues("max")
            ?.first()
            ?.toInt()
            ?.coerceIn(MIN_FACTS_NUMBER, MAX_FACTS_NUMBER)
            ?: DEFAULT_FACTS_NUMBER
    }

    companion object {
        private const val DEFAULT_FACTS_NUMBER = 5
        private const val MIN_FACTS_NUMBER = 1
        private const val MAX_FACTS_NUMBER = 10
    }
}
Storing and Reading Facts
With the facts now in the request context, they can be utilized in our controller.
@RestController
class CatFactController(
    // Would be automatically injected by Spring
    private val requestContext: RequestContext,
    private val catFactService: CatFactService,
) {
    @GetMapping("/api/v1/cat/facts")
    suspend fun getCatFacts(): ResponseEntity<FactsResponse> {
        val facts = requestContext.facts ?: throw RuntimeException("Could not read facts")
        catFactService.storeFacts(facts)
        return ok(facts.toResponse())
    }
}

private fun Set<Fact>.toResponse() = FactsResponse(this)

data class FactsResponse(val facts: Set<Fact>)
Our relatively straightforward service merely iterates over the available facts, storing each in turn.
@Service
class CatFactService(private val repository: CatFactRepository) {
    suspend fun storeFacts(facts: Set<Fact>) =
        facts.forEach { repository.storeFacts(it) }
}
The remaining step is saving our facts to the database. We’ll use Flyway for database migrations and JOOQ for database interaction. Begin by establishing a table in the database.
Add the following SQL script to the src/main/resources/db/migration/V1.0.0__init_db.sql folder:
CREATE TABLE cat_facts (
    hash INT PRIMARY KEY,
    fact TEXT NOT NULL
);
The facts lack unique identifiers, so we’ll use the fact’s hash to check if it’s already in the database. Although this method isn’t ideal, it suits our needs.
Lastly, we’ll develop a repository to save the facts in the database. This straightforward repository will add facts and skip those already present.
@Repository
class CatFactRepository(private val jooq: DSLContext) {
    suspend fun storeFacts(fact: Fact) =
        with(Tables.CAT_FACTS) {
            jooq.insertInto(this, HASH, FACT)
                .values(fact.hashCode(), fact.value)
                .onConflict(HASH)
                .doNothing()
                .execute()
        }
}
Dockerizing the Project
To replicate our services’ production behavior, we’ll use Docker to create an image, subsequently testing our service.
FROM --platform=linux/x86_64 eclipse-temurin:17-jre-alpine

ENV APP_BASE="/home" \
    APP_NAME="cat-fact-service" \
    SERVER_PORT="8080"

EXPOSE ${SERVER_PORT}

# Install helper tools for debugging
RUN apk update && apk upgrade && apk add curl openssl gcompat bash busybox-extras iputils

RUN mkdir -p ${APP_BASE}/${APP_NAME}

COPY build/libs/${APP_NAME}*.jar ${APP_BASE}/${APP_NAME}.jar

CMD java -jar ${APP_BASE}/${APP_NAME}.jar
To verify your project’s functionality, execute:
$ ./gradlew assemble
$ docker build -t cat-fact-service .
Your output should be similar to the following:
[+] Building 2.3s (10/10) FINISHED                                                                                                     docker:desktop-linux
 => [internal] load build definition from Dockerfile                                                                                                   0.0s
 => => transferring dockerfile: 453B                                                                                                                   0.0s
 => [internal] load .dockerignore                                                                                                                      0.0s
 => => transferring context: 2B                                                                                                                        0.0s
 => [internal] load metadata for docker.io/library/eclipse-temurin:17-jre-alpine                                                                       1.5s
 => [auth] library/eclipse-temurin:pull token for registry-1.docker.io                                                                                 0.0s
 => [1/4] FROM docker.io/library/eclipse-temurin:17-jre-alpine@sha256:e90e0d654765ab3ae33f5c5155daafa4a907d0d738ce98c3be8f402a8edcee2b                 0.0s
 => [internal] load build context                                                                                                                      0.6s
 => => transferring context: 82.75MB                                                                                                                   0.6s
 => CACHED [2/4] RUN apk update && apk upgrade && apk add curl openssl gcompat bash busybox-extras iputils                                             0.0s
 => CACHED [3/4] RUN mkdir -p /home/cat-fact-service                                                                                                   0.0s
 => [4/4] COPY build/libs/cat-fact-service*.jar /home/cat-fact-service.jar                                                                             0.1s
 => exporting to image                                                                                                                                 0.1s
 => => exporting layers                                                                                                                                0.1s
 => => writing image sha256:0b65dc5d8e98c9b095ce4bd38ab28eae8320ff1cfb089b59b039d3753cf6ec45                                                           0.0s
 => => naming to docker.io/library/cat-fact-ser
Setting up docker-compose
While the service is operational, the database setup remains. Docker-compose will establish both the database and the service.
At your project’s root, create a new file named docker-compose.yml with the following content:
version: '3'

services:
  cat-fact-service:
    container_name: cat-fact-service
    networks:
      - proxynet
    build: ../..
    ports:
      - "8080:8080"
    depends_on:
      - postgres
    environment:
      - DB_HOST=postgres
      - DB_PORT=5432
      - DB_NAME=facts
      - DB_USER=postgres
      - DB_PASSWORD=secret

  postgres:
    container_name: cat-fact-service-postgres
    networks:
      - proxynet
    image: postgres:14
    restart: always
    environment
      POSTGRES_USER: postgres
      POSTGRES_PASSWORD: secret
      POSTGRES_DB: facts
    ports:
      - "5432:5432"

networks:
  proxynet:
    name: cat-fact-service-network
Running the Service
You can now launch and assess the service by executing:
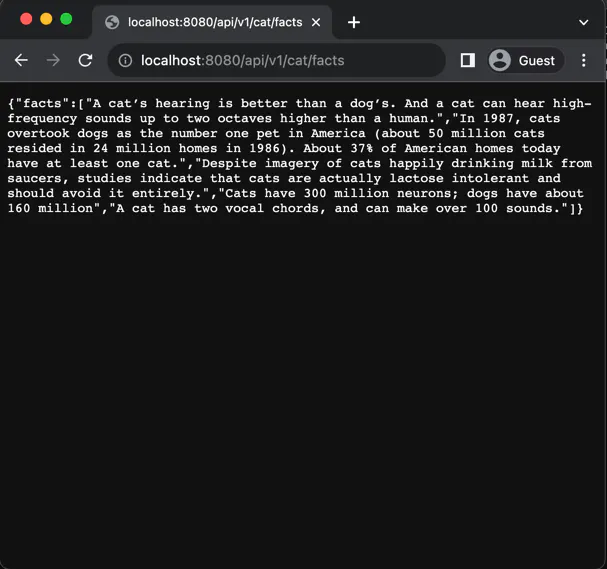
$ docker-compose upOnce Spring notifies you that the service is operational, access it via your browser at http://localhost:8080/api/v1/cat/facts.
If executed correctly, the response should resemble:
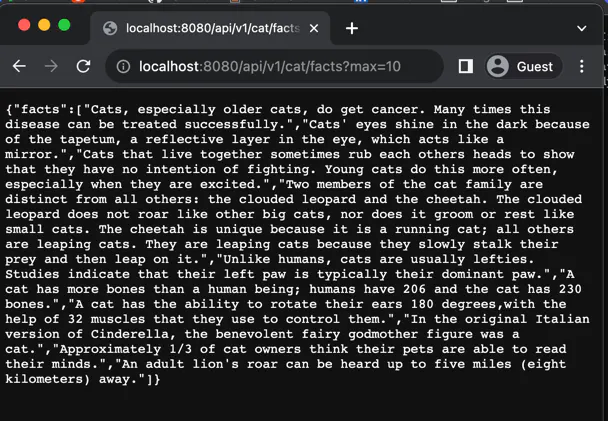
To retrieve a custom number of facts, use the max query parameter. For ten facts, navigate to http://localhost:8080/api/v1/cat/facts?max=10.
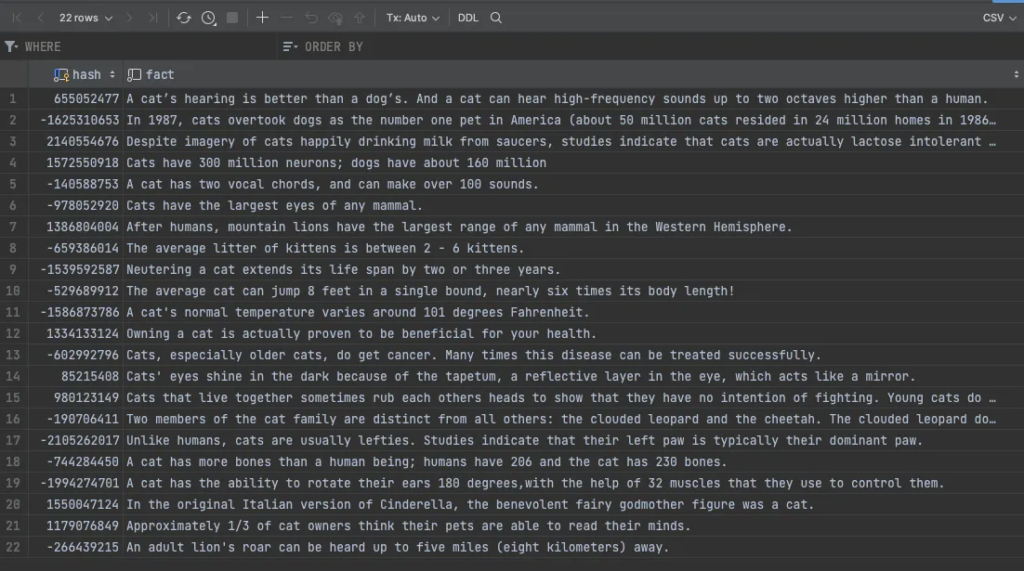
Inspecting the database will confirm the successful storage of facts.
Our service logic is ready!
Alternatively, you can pull the docker image that I have created from GHCR by changing your docker-compose file as follows:
version: '3'

services:
  cat-fact-service:
    container_name: cat-fact-service
    image: ghcr.io/yonatankarp/cat-fact-service:latest
    networks:
      - proxynet
    ports:
      - "8080:8080"
    depends_on:
      - postgres
    environment:
      - DB_HOST=postgres
      - DB_PORT=5432
      - DB_NAME=facts
      - DB_USER=postgres
      - DB_PASSWORD=secret

  postgres:
    container_name: cat-fact-service-postgres
    networks:
      - proxynet
    image: postgres:14
    restart: always
    environment:
      POSTGRES_USER: postgres
      POSTGRES_PASSWORD: secret
      POSTGRES_DB: facts
    ports:
      - "5432:5432"

networks:
  proxynet:
    name: cat-fact-service-network
Part 3 – Setting Up Instrumentation with OpenTelemetry
Code examples related to this service can be found here on the branch add-instumentation.
HoneyComb.io
Introduction
In this article, we’ll use HoneyComb.io as our tracing backend. While there are other tools in the market, some of which can be run on your local machine (e.g., Jaeger), I chose HoneyComb because of their complementary tools that offer improved monitoring of the service and insights into its behavior.
HoneyComb is a cloud-based observability platform that helps developers gain insights into their software systems. They provide tools such as SLA/SLO monitoring, distributed tracing, and real-time log aggregation. This enables us to quickly identify and address problems before they affect users. HoneyComb operates on an event-based data model, which means engineers can explore and analyze data in real-time, drilling down into specific issues to identify the root cause and take corrective action. HoneyComb also offers visualization tools like heatmaps, histograms, and scatter plots, but we won’t cover them in this series.
Setting up
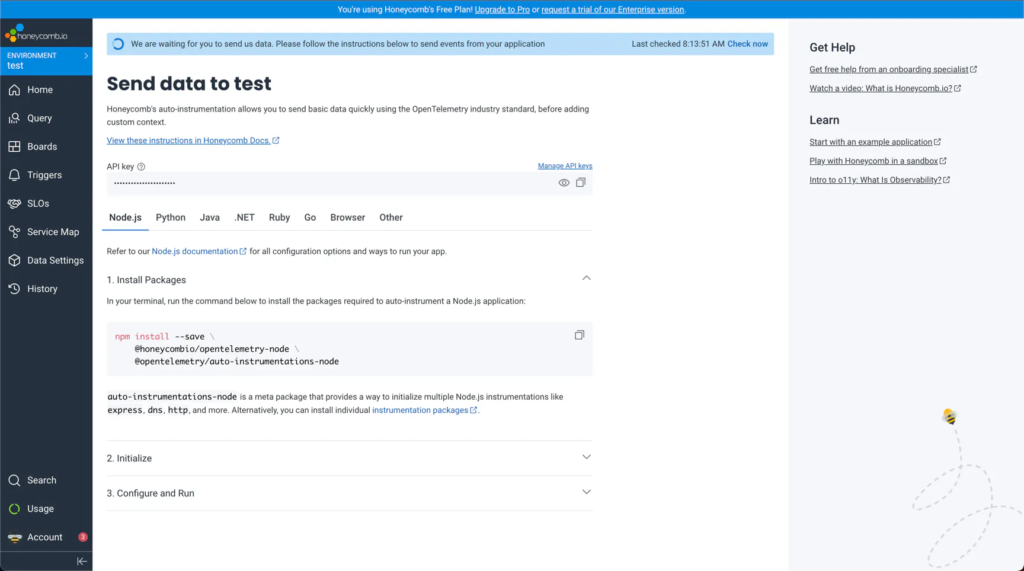
You can sign up for a free HoneyComb account that processes up to 20 million events per month, which is more than sufficient for our needs. To create an account, visit HoneyComb.io, click on the Start for Free button, fill in your information, and set up a team.
For this article, we will use the default test environment, but you can create additional environments as you see fit.
After setting up, you should land on a page that looks like this:
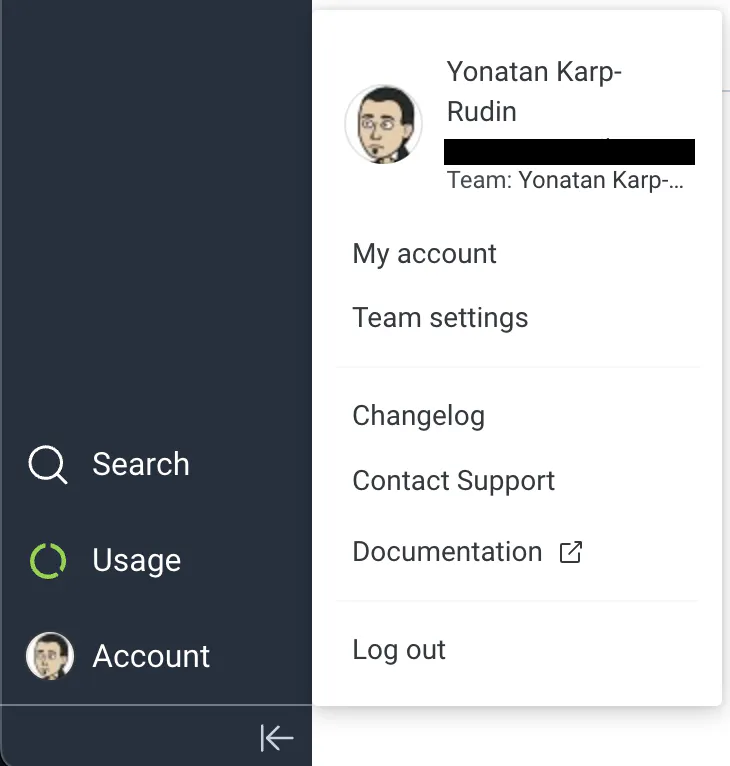
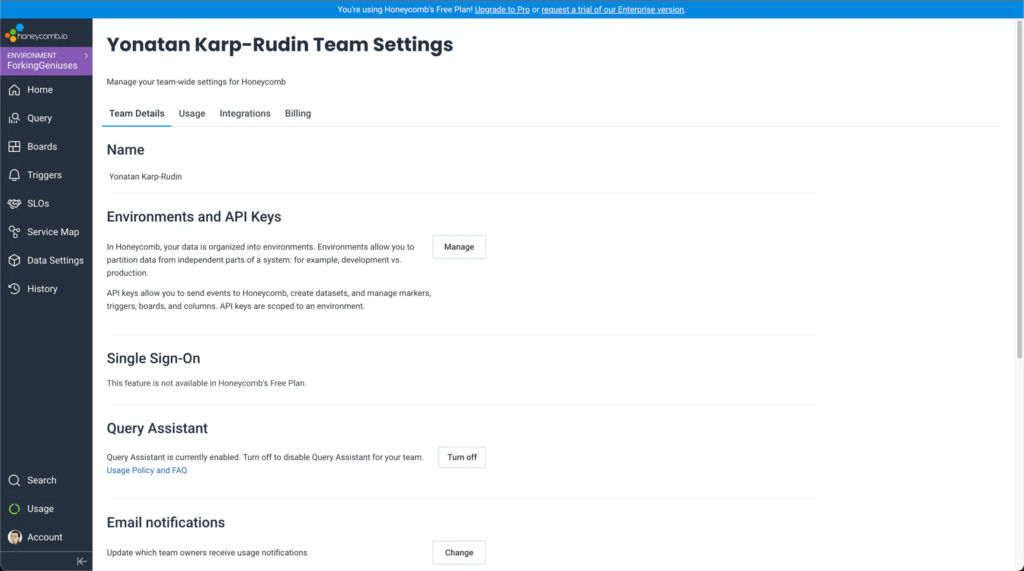
Next, we’ll create a new API key for our service to send data to HoneyComb. To do this, click on Account ➡️ Team settings. On the following page
Under the Environments and API Keys section, click the Manage button.
On the next page, click the Create API Key button and name it. For this tutorial, let’s call it local (indicating local execution). We want to limit our key’s scope to the minimum required, so the key should have only the Send events and Create datasets permissions.
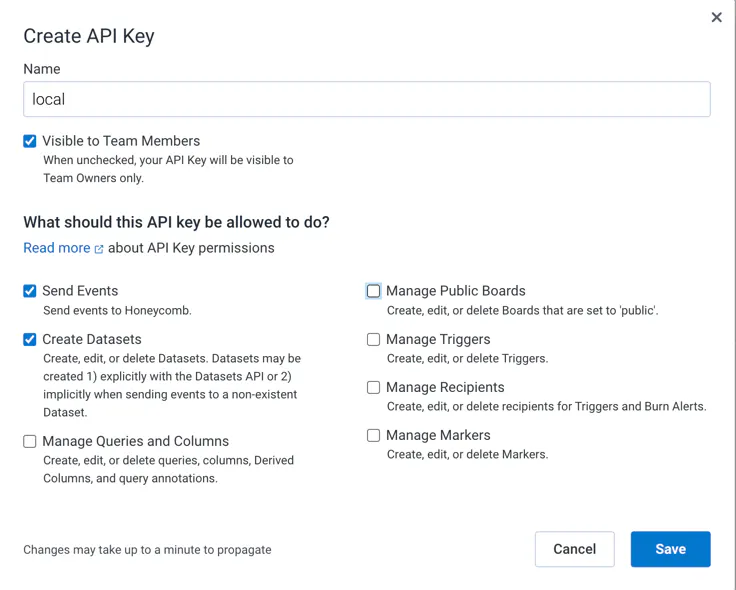
Once you’ve made these selections, click the Save button. You should now see the key displayed on your screen. We’ll use this key later when configuring our service.
Setting Up OpenTelemetry
This section will detail how to equip our service with OpenTelemetry, which is the primary focus of this article.
Prerequisites
To achieve this, we will add the following to our project:
- OpenTelemetry Agent – for automatic tracing
- OpenTelemetry SDK – for manual tracing
- A Gradle task to fetch the OpenTelemetry Java agent before every build
- Configuration of the OpenTelemetry agent within the
bootRuntask for local testing - Modifications to the
Dockerfileto integrate the OpenTelemetry agent - Modifications to the
docker-compose.ymlfile to add the OpenTelemetry agent’s environmental settings
Time to dive in!
Integrating the OpenTelemetry SDK and Agent
First, we’ll add the OpenTelemetry SDK and agent dependencies to our project. HoneyComb provides a library that extends the basic functionality of the JVM OpenTelemetry, and we will use it.
Dependency Integration
We will start by adding our dependencies within build.gradle.kts:
dependencies {
  implementation("io.honeycomb:honeycomb-opentelemetry-sdk:1.7.0")
  // We're using compileOnly as we need this dependency only to set the
  // agent on our docker image and local development
  compileOnly("io.honeycomb:honeycomb-opentelemetry-javaagent:1.7.0")
}
Constructing the Gradle Task for the OpenTelemetry Agent
Once we’re done, we will create a new Gradle task (called copyOpenTelemetryAgent) that will copy the OpenTelemetry agent to the build/output/libs directory before each build by making the build task depends on it.
tasks {
  build {
    dependsOn("copyOpenTelemetryAgent")
  }

  register<Copy>("copyOpenTelemetryAgent") {
    project.delete(
        fileTree("${layout.buildDirectory.get().asFile}/output/libs")
    )

    from(configurations.compileClasspath)
    into("${layout.buildDirectory.get().asFile}/output/libs")
    include("honeycomb-opentelemetry-javaagent*")
    // We want to remove the version from the jar file name for easier
    // referencing during the service execution
    rename("-[1-9]+.[0-9]+.[0-9]+.jar", ".jar")
  }
}
You can refresh Gradle and see that the new task appears:
We can run the build task and see that the OpenTelemetry agent is copied to the build/output/libs directory:
Modifying the bootRun Task
Next, we’ll update the bootRun task to include the OpenTelemetry agent. By doing so, we can run the service locally and have it send data to HoneyComb.
Add the following to the bootRun task in your build.gradle.kts file:
tasks {
    bootRun {
        environment = mapOf(
            "HONEYCOMB_API_KEY" to System.getenv("HONEYCOMB_API_KEY"),
            "SERVICE_NAME" to "cat-fact-service",
            "HONEYCOMB_API_ENDPOINT" to "https://api.honeycomb.io:443",
            "ENVIRONMENT" to "test",
        )

        jvmArgs = listOf(
            "-javaagent:${layout.buildDirectory.get().asFile}/output/libs/honeycomb-opentelemetry-javaagent.jar",
            // Passing static parameter to the collector, in this case -
            // a reference to the GitHub repository
            "-Dotel.resource.attributes=github.repository=https://github.com/ForkingGeniuses/cat-fact-service",
        )
    }
}
Note that to work, this task needs the HONEYCOMB_API_KEY environment variable to be set with the API key we created earlier. Moreover, currently, we’re calling the HoneyComb API directly, so we need to set the HONEYCOMB_API_ENDPOINT environment variable to https://api.honeycomb.io:443. In a future article, we might fix this by using the OpenTelemetry collector.
Local Service Execution
We can now run the service, and observe the data being sent to HoneyComb.
To run our service, execute the following command (ensure that the database is running):
$ ./gradlew bootRunGenerate some data by accessing the endpoint a few times:
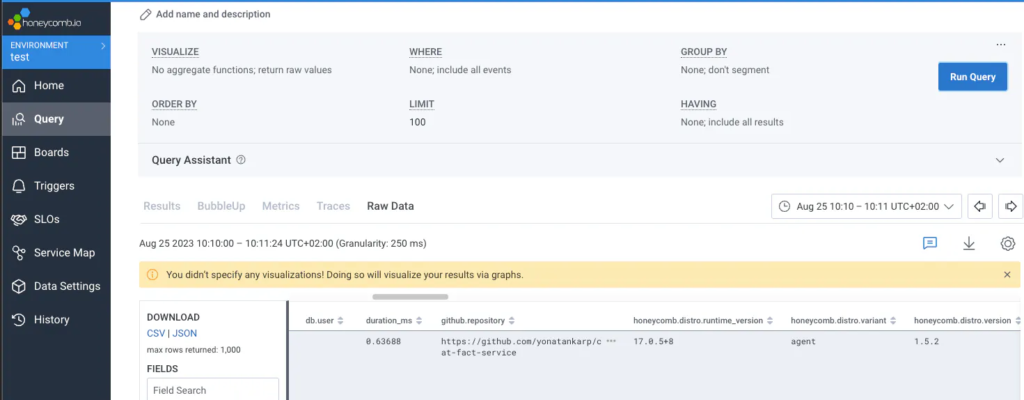
$ curl http://localhost:8080/api/v1/cat/factsGo to the HoneyComb UI and click on the Query button. You can click the Run Query button to see the data being sent to HoneyComb. You can see for example our github.repository attribute being sent:
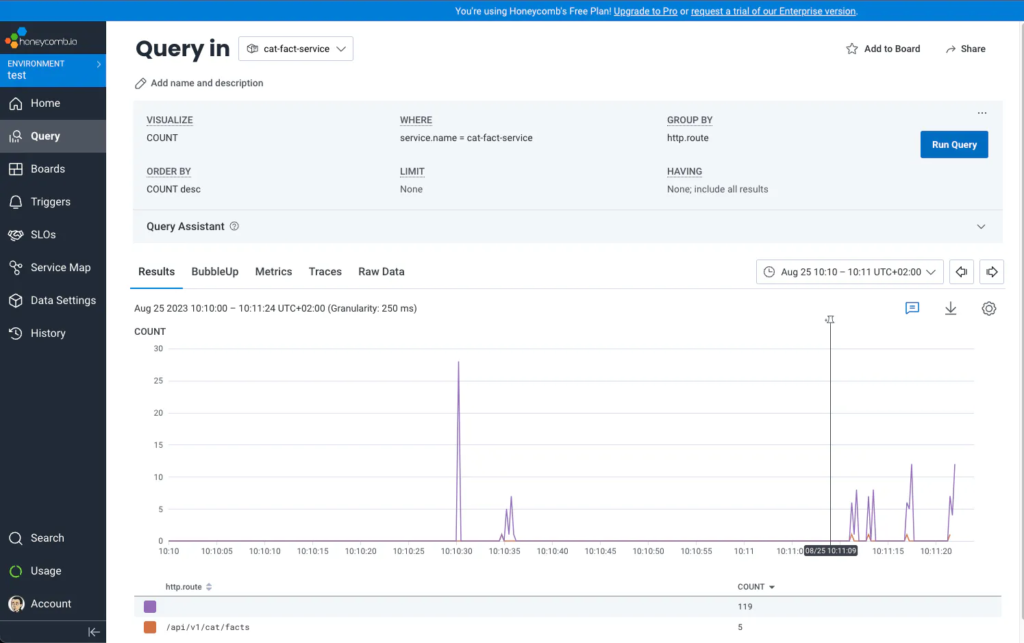
We can also create a graph to visualize the data by selecting anything under VISUALIZE box. For example:
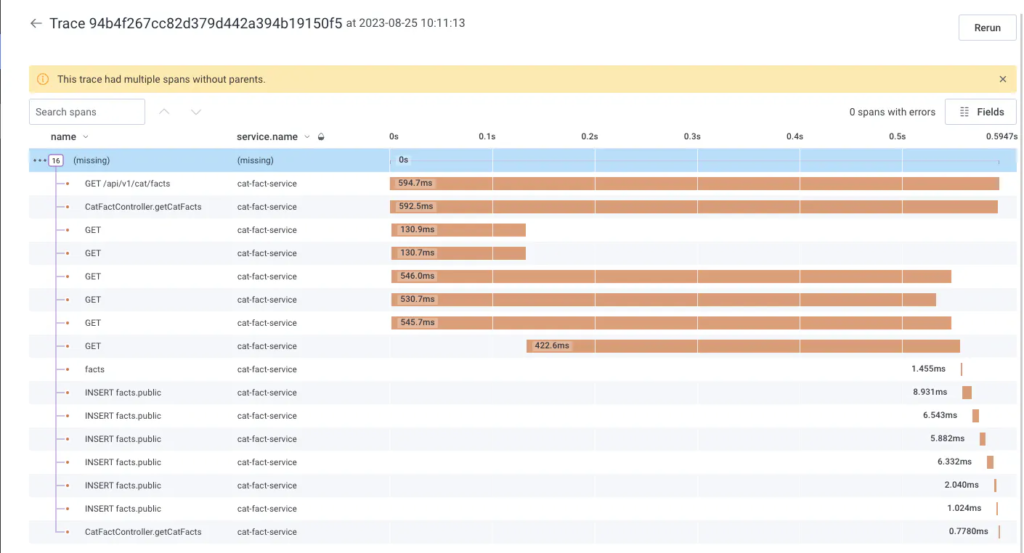
Lastly, we can drill down into a specific trace by clicking on the traces, and see the execution path of the request:
Modifying the Dockerfile
Running the service locally is great, but we want to run it in a container. By doing so, we can execute the service in a more production-like environment.
The changes required to run the service in a container are minimal. We need to add the OpenTelemetry agent to the container and set the environment variables required by the agent.
We will also add our static attributes to the agent, so we can easily filter the data in HoneyComb. We can have multiple attributes separated by a comma. For example:
github.repository=https://github.com/yonatankarp/cat-fact-service,slack.channel=#cat-factsOur updated Dockerfile will look like this:
 FROM --platform=linux/x86_64 eclipse-temurin:17-jre-alpine

 ENV APP_BASE="/home" \
     APP_NAME="cat-fact-service" \
+    OTEL_ATTRIBUTES="github.repository=https://github.com/yonatankarp/cat-fact-service" \
     SERVER_PORT="8080"

 EXPOSE ${SERVER_PORT}
 RUN apk update && apk upgrade && apk add curl openssl gcompat bash busybox-extra

 RUN mkdir -p ${APP_BASE}/${APP_NAME}

+# Otel agent
+COPY "/build/output/libs" "${APP_BASE}/${APP_NAME}"
+
+COPY "/build/libs/${APP_NAME}*.jar" "${APP_BASE}/${APP_NAME}.jar"


 CMD java $JAVA_OPTS \
+    -Dotel.resource.attributes="${OTEL_ATTRIBUTES}" \
+    -javaagent:${APP_BASE}/${APP_NAME}/honeycomb-opentelemetry-javaagent.jar \
     -jar ${APP_BASE}/${APP_NAME}.jar
Modifying the docker-compose.yml File
Lastly, the docker-compose.yml will need updating to add the required environment variables:
@@ -16,6 +16,10 @@ services:
       - DB_NAME=facts
       - DB_USER=postgres
       - DB_PASSWORD=secret
+      - HONEYCOMB_API_KEY=${HONEYCOMB_API_KEY}
+      - SERVICE_NAME=cat-fact-service
+      - HONEYCOMB_API_ENDPOINT=https://api.honeycomb.io:443
+      - OTEL_JAVAAGENT_DEBUG=false

   postgres:
     container_name: cat-fact-service-postgres
Activate the entire configuration using docker-compose:
$ docker compose upConclusion
In this article we’ve followed the steps of building our business logic in a library, integrating it into a REST service, and adding instrumentation to the system to monitor its behavior. I hope that in this article I helped you to see how enhancing your codebase with OpenTelemetry allows you to monitor your service and gain valuable insights into its behavior. By integrating HoneyComb.io, the OpenTelemetry SDK, and the agent, you can effectively set up observability for your service while also benefiting from HoneyComb’s powerful analysis tools
Acknowledgments
Mariusz Sołtysiak – for moral support, review, and suggestions while writing this article.
Credits
- Photos by niko photos on Unsplash.
Leave a Reply